

A data structure that operates on a first in, first out (FIFO) principle is a queue. Items are added to the back of the line and taken out of the front. The actions of adding data to the queue are referred to as “enqueue,” while removing data from the queue is referred to as “dequeue.”
A priority queue is a queue type where the items are organized according to the priority values you give them. In.NET 6, support for a priority queue was first made available. The PriorityQueue class in.NET 6 and how to use it in our.NET 6 applications are covered in this article.
You need Visual Studio 2022 installed on your computer in order to work with the code examples provided in this tutorial. Download Visual Studio 2022 here if you don’t already have it.
Create a console application project in Visual Studio
Let’s start by opening Visual Studio and creating a.NET Core Console Application project. To build a new.NET Core Console Application project in Visual Studio, follow the instructions listed below, assuming Visual Studio 2022 is already installed on your computer.
- Launch the Visual Studio IDE.
- Click on “Create new project.”
- In the “Create new project” window, select “Console App (.NET Core)” from the list of templates displayed.
- Click Next.
- In the “Configure your new project” window shown next, specify the name and location for the new project.
- Click Create.
In the sections that follow, we’ll use this project to demonstrate how to work with a priority queue.
Create a priority queue in .NET 6
In.NET 6, a queue is typically a FIFO data structure, where items are added to the back and taken away from the front. In.NET 6, there is a special kind of queue called a priority queue that arranges the items according to the priority values you give them.
Using the constructor of the PriorityQueue class, as shown below, you can create an instance of the class.
The Enqueue() method can be used to add items to a PriorityQueue after it has already been created. Two parameters are accepted by the Enqueue method: the element to be added as a string and the element’s priority as an integer.
Keep in mind that items in a priority queue are arranged according to priority values, descending. As a result, the item with the highest priority (for example, 9) is placed at the back of the queue, and the item with the lowest priority (for example, 0) is placed at the front. The item with the lowest priority value is thus removed by a dequeue.
The Enqueue method is used to add items to a priority queue, as demonstrated by the following snippet of code.
PriorityQueue<string, int> priorityQueue = new PriorityQueue<string, int>();
priorityQueue.Enqueue("Item A", 4);
priorityQueue.Enqueue("Item B", 3);
priorityQueue.Enqueue("Item C", 2);
priorityQueue.Enqueue("Item D", 6);
priorityQueue.Enqueue("Item E", 7);
priorityQueue.Enqueue("Item F", 5);
priorityQueue.Enqueue("Item G", 0);
priorityQueue.Enqueue("Item H", 9);
priorityQueue.Enqueue("Item I", 1);
priorityQueue.Enqueue("Item J", 8);
Retrieve elements from a priority queue in .NET 6
There are two ways to get items out of a PriorityQueue. The Dequeue() method, which returns the queue item with the lowest priority value, is one choice. The Peek() method, which returns the item with the lowest priority value without removing it from the queue, is the alternate choice.
The TryDequeue and TryPeek methods, which handle exceptions internally, are improved versions of the Dequeue and Peek methods. If an item has been successfully removed from the queue, they return true; if not, they return false.
The next piece of code shows you how to display each item’s priority at the console window and remove items from the priority queue.
while (priorityQueue.TryDequeue(out string queueItem, out int priority))
{
 	Console.WriteLine($"Item : {queueItem}. Priority : {priority}");
}
Count the elements in a priority queue in .NET 6
To find out how many items are currently in the priority queue, use the following snippet of code.
int ctr = priorityQueue.Count;
Console.WriteLine($"No of items remaining in the priority queue : {ctr}");
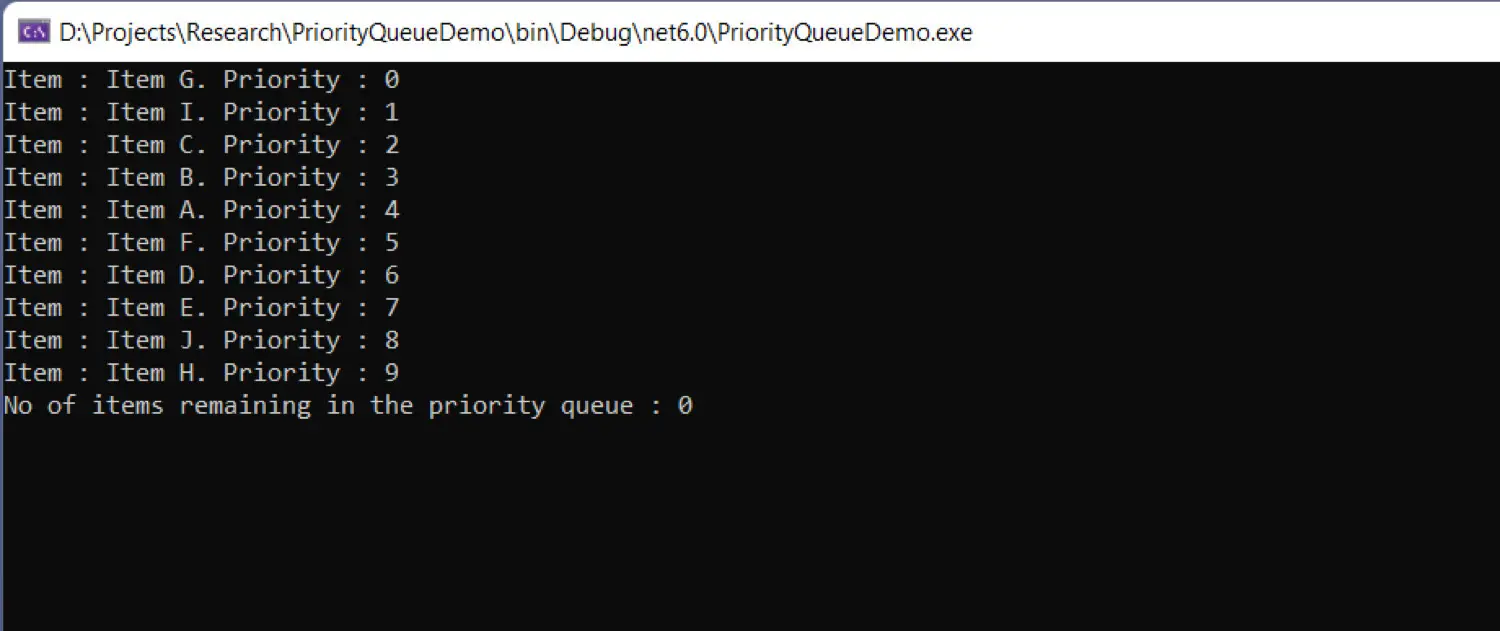
The priority queue will have no available items if you add these lines of code as shown below after the while statement in our program. This is so because each time the TryDequeue method is called, a component of the priority queue is eliminated.
while (priorityQueue.TryDequeue(out string queueItem, out int priority))
{
	Console.WriteLine($"Item : {queueItem}. Priority : {priority}");
}
int ctr = priorityQueue.Count;
Console.WriteLine($"No of items remaining in the priority queue : {ctr}");
If you run our program with the code above, it will display the items of the priority queue and their priority values. Lastly, it will print a value 0, which denotes the total number of elements remaining in the priority queue at the end.
The IComparer interface is used by a priority queue in.NET 6 to determine the priority of the elements stored there. To determine the priorities of elements in a priority queue, you can create your own implementation of the IComparer interface. In a later post here, I’ll go into more detail about this.
A PriorityQueue instance is not thread-safe, it should be noted. To prevent race conditions, you should write your own custom code to handle thread safety. Operating systems frequently use priority queues for load balancing, thread scheduling, and interrupt management. An operating system will keep track of threads in a priority queue and schedule or preempt them as necessary.